

After making the DIY Steadicam I decided to move onto making a shoulder rig. I wanted one but even cheap rigs are out of my price range. I wanted a full rig and so buying just a cheap shoulder mount which held the camera and nothing else wasn’t really an option. So I decided to make my own, I had a look at the bought rigs and thought ‘how hard can it be?’…
a few examples..
After doing a lot of research into other DIY Shoulder Rigs I came up with sort of a design.
I liked this DIY matte box in a youtube tutorial and so made this first.
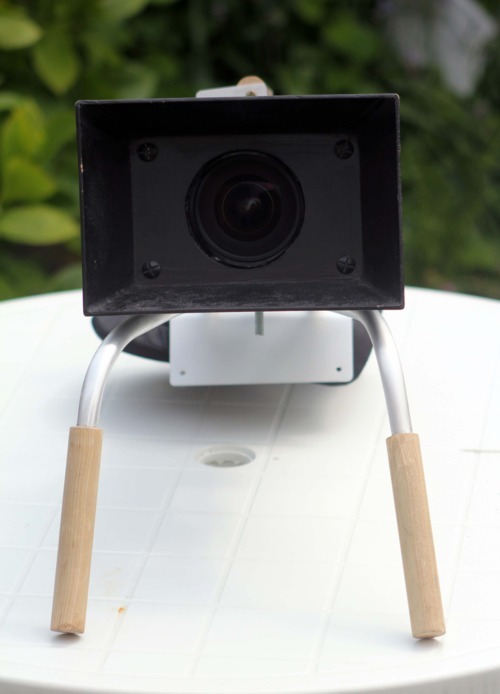
Work in progress shot. Matte box made out of MDF held together with PVA glue. It’s designed to fit round my largest lens which is a Samyang 14mm 2.8 which is huge!
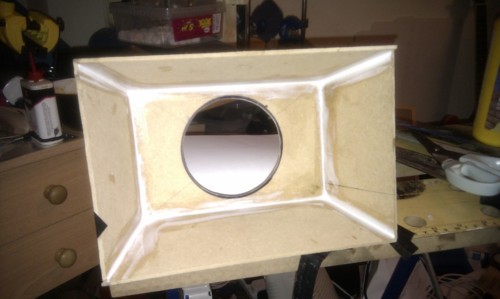
I followed the Youtube tutorial pretty closely and ended up with this matte box.
At this point I had also added the rails which was the bases for my rig. After looking at a lot of other DIY rigs this seemed to be the best way of making a rig.
The hardest part was finding some way of attaching the 2 rods together and creating a base to add the different modules to the rig.
There are a lot of good tutorials but this seems to be an area where they all have trouble with. There was one where someone used clamps that are designed to keep car engine pipes tidy which is a very nice solution but in the end I found what I needed in an iron mongers. A u shaped piece of metal for gate bolts and a metal bracket that fitted together provided what I needed and where versatile enough that I can base all of the modules on this design.
shown here the nearly finished matte box along with rails and rail clamps.
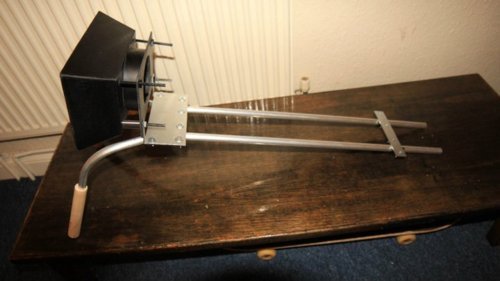
The rails are aluminium tubes, I chose this because it’s light and relatively easy to bend into the shaped handles but it’s also stiff enough and with all the rail clamps in place it will be plenty rigid.
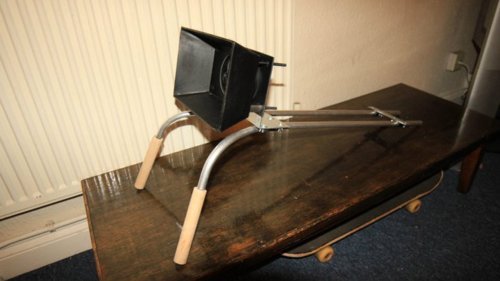
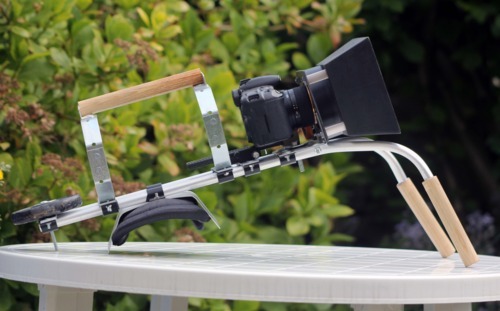
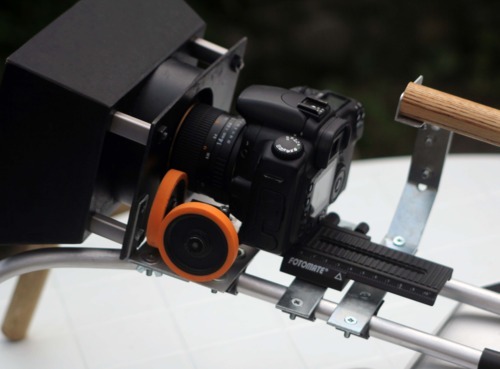
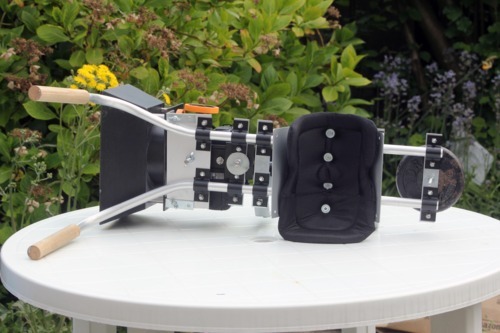
This is the rig with the finished matte box, first attempt at a follow focus, shoulder rest, counter weight and carrying handle. 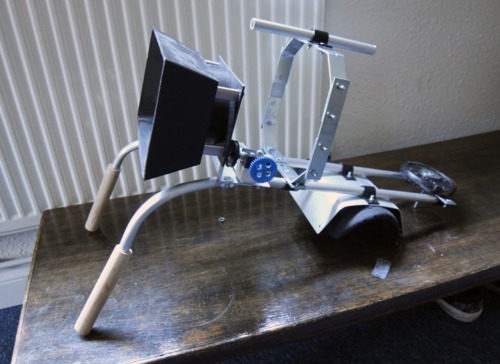
I bought a Huco gearbox but had a lot of trouble getting gears to use for it, i got these ones from a local maplin but they didn’t work at all, this version was an attempt at a belt driven follow focus.
The follow focus was by far the biggest pain in the ass while making this rig, i went through several designs and redesigns before making something that worked including the Helicopter gear focus ring
This is a brilliant idea and worked really well for lens gears but the problem is the teeth are really small and I couldn’t find a suitable gear for the gearbox.
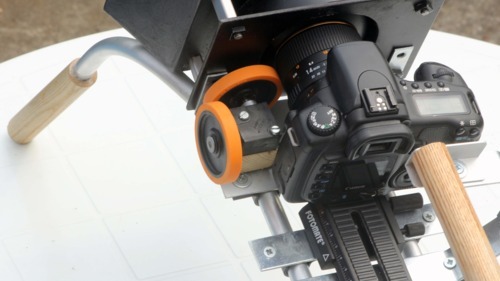
In the end i went with a friction follow focus, first making a skate wheel style one and then moving on to an Ikan style one using bane bot wheels, this is the follow focus i am currently using and seems to be working really well.
Couple of points to note however, it works much better with manual lenses due to the larger focus throw and i had some trouble with the cannon 1.2 50 and 1.2 85 as the focus rubber grip tended to slip a bit, this isn’t too much of a concern for however as I was borrowing them and can in no way afford them, problem solved. It does however work very well on my Samyang 14mm 2.8 shown in the picture bellow
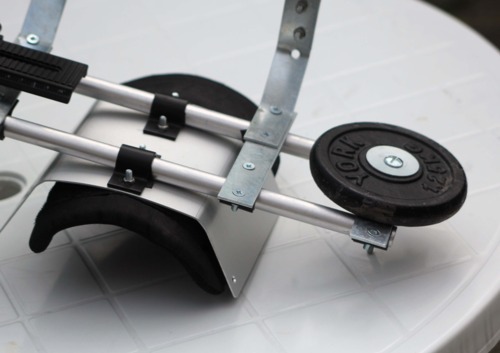
After several tests with the carry handle as it was proved it to be annoying and impractical I had to change it. Originally it only had one bracket holding it up but it was very flimsy so i had to add another one but this just got in the way. I was adamant that I wanted the handle so I had to rethink the problem, I shortened the handle bracket length to give it less flex and remounted them at the front and back of the handle both on one side. This had the desired effect and now it is sturdy and practical. The handle is balanced so when you hold the camera is steady, this works well for moving low shots. The handle brackets are also going to double up as mounts for audio equipment.
The shoulder rest under the handle is also balanced with the weight being slightly forward, this takes a lot of weight off your arms. I was suprised when i used a friends rig that seems to be quite popular at the moment
It was incredibly uncomfortable to use, all the weight is on the front so you are constantly holding it up and there is a support which rests on your ribs which seems to be designed for minimal comfort, also when you are filming your breathing moves the camera up and down if you chose to use the rib spike.
Although the counter weight makes the rig overall heavier the weight distribution it allows creates a much more comfortable to use rig and also allows the balanced handle.
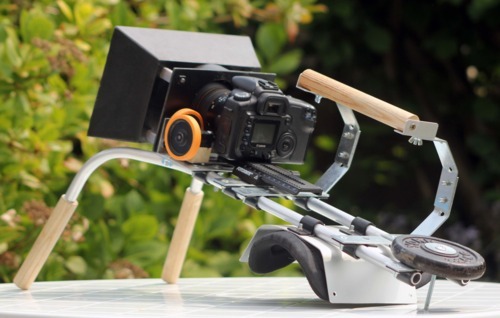
The shoulder padding was made from a builders knee pad with the hard plastic cap taken off, these are great as shoulder pad rests as they are already in a perfect shape, I bent a thin piece of aluminium round it for support.

I wanted the design to be quite stylish, which is why I used wood and aluminium. Eventually when I have ironed out all the kinks I will spray the modules black leaving the rails as brushed aluminium.
Wood works well for the handles, it’s nice to hold and light. The wooden handles were attached with a dowel plug drilled into the wood and slotted in the aluminium tube. At first I tried using various glues for this but none of them would dry properly so I eventually used wood filler. This worked surprisingly well, filling in any gaps that would allow movement and holding the handles in fast.
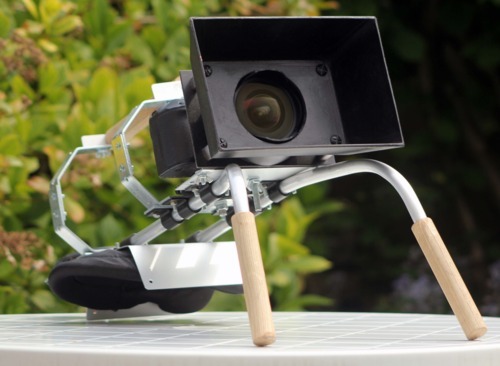
The matte box works well but could do with a filter tray, this will probably be my next step for this DIY rig. I have also been toying with the idea of adding hinged extensions for the matte box but so far I haven’t had any trouble with flaring.
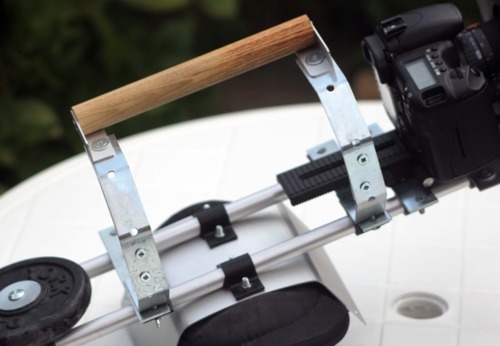
The handle brackets are the same ones used for the rest of the rig on he modules but just bent at 45 degree angles, losing the extra bracket that was in the middle removed a lot of the bounce problem. In this picture you can also see the fence bolt U’s more clearly.
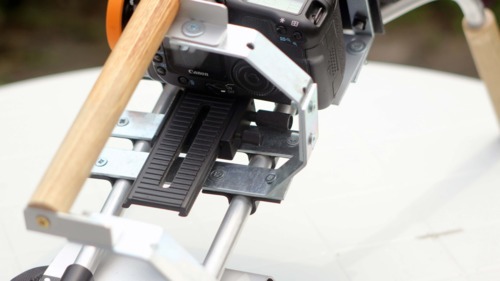
In the end i settled with an Ikan style follow focus which is working really well. I do however need to make a sturdier mount for it. Currently it is attached with a piece of aluminium with a strip cut out the middle so it can be adjusted but the aluminium is quite flimsy so it needs something a bit sturdier to mount on.
To mount the camera i settled on a macro slider, I had seen in another DIY rig tutorial that someone had used one and it seemed like a great solution, it was cheap (about £14) and created the adjustment ability my rig needed to line the focus wheel with the lens focus grip. I got mine off ebay from Hong Kong, cheap but took about a month to arrive.
Detail of how the handle and counter weight are attached to the rig and held together.
The Gate bolt U’s where slightly too big for the aluminium rails so each one has a strip of rubber lining it, this creates a very rigid hold but means the rig is not easily adjustable. This however is not a problem, once the rig is set up it doesn’t need to be adjusted except for where the macro slider allows it to.
The macro slider has a knob for moving it backwards and forwards and also another one to lock it in position, so far I have had no trouble with this.
For the follow focus I used the Huco gear box which can be a bit of a pain to get hold of and bane bot wheels. The biggest problem I had with this was attaching the bane bot wheel hubs to the gear box axle. The axle being smooth meant that no matter how tight I did the fixing screw on the wheel hub it kept slipping, in the end i drilled into the axle so the screw had something to sit in and used a liberal amount of araldite which seems to be working.
Detail of the underneath. The metal brackets i used for all the modules weren’t counter sunk so i used washers that the tip of the bolts could sit in to improve the overall look of the rig.
i have to laugh :D but it looks useful still
ReplyDeleteAs usual, immaculate detail in your work, BW.
ReplyDeleteWow!
ReplyDeleteDid you really make this yourself? this is impressive... nice camera too, my friend has the same model ;D
that is awesome!
ReplyDeletelook at that weight. at the same time you are shooting, you are exercising too xD..cool post, subbed!
ReplyDeleteunbelievable. such a great idea!
ReplyDeleteThats a pretty nice invention!
ReplyDeleteIts really fantastic product. Equipment that you may be interested in purchasing includes the ProAim DSLR kit. This is a camera dolly that is utilized in forming smooth movements and actions.
ReplyDeleteMerline Steadicam
Hey, Sweet rig!! How did you make the Follow Focus thing though?
ReplyDelete